
When you’re searching in Evernote, there are many different ways to go about whittling down the results.
From simply typing into the box with the magnifying glass to more advanced search techniques such as using syntax, there’s a lot of options. While advanced search techniques may sound like a pretty intimidating topic that is somehow both mildly threatening and hopelessly out of reach, it’s really just a fancy way of saying there are lots of ways to step up your search game in Evernote.
Unlock the power behind the search bar
Why do we even need advanced search techniques? How hard can it be?
Everyone knows about the most basic approach to search: typing into Evernote’s search bar and then scrolling through the results to find what you were looking for. Pretty obvious.
But eventually, there will come a time when you are returning too many results for a simple search to handle. As you start to put more and more into Evernote, it can be harder to find what you need with plain old, regular searching. For example, if I type meeting notes into the search bar, my Evernote Business account returns precisely 4,144 results, which is a bit more than my “scroll and look” abilities can handle.
Luckily, there’s more to this little search box than meets the eye. Underneath the hood are some powerful tools, such as advanced search syntax, application shortcuts, and more.
Advanced search tips for the less advanced
Advanced search is really just about speaking to the technology powering Evernote in a tongue that it understands. You can dive into advanced search syntax in Evernote with this help article to master all the search terms we have or check out this video for a quick primer.
To make life even easier, we’ve rounded up some of our favorite advanced search methods here so you can just grab and go. (That way you can save the somewhat formidable task of learning search syntax and memorizing shortcuts for your future self.)
1. Take a shortcut
To start things off easy, try your hand at some powerful search keyboard shortcuts.
- Quickly access the search bar in Evernote by using Option + Cmd + F for Mac or Ctrl + Q for Windows.
- To search specifically within the note you currently have open, use Ctrl + F in Windows and Cmd + F for Mac.
- As long as Evernote is running in the background, using Win + Shift + F in Windows and Ctrl + Cmd + E in Mac will immediately take you to our search bar. No matter whether you’re working in your browser or in iTunes, you can always get straight to the search by jumping directly into Evernote.
- Need a specific note, notebook, or tag in a pinch? Use Cmd + J with Evernote for Mac or Ctrl + Q for Windows to “jump” there, fast. You can see your most recent notebooks or just search for other things in general. Try it out—you’ll quickly see why this shortcut is a favorite.
2. Cut straight to the notebook
If you’re team notebooks in the ongoing battle between notebooks and tags] then you probably have a lot of them and it may take you a while to navigate to the exact one you are looking for.
- Find things in a specific notebook by typing notebook:insert notebook name into the search bar. Be sure not to include a space between the colon and the name of your notebook. (I may or may not be speaking from experience).
3. The power of any
If you type meeting notes into the search bar, Evernote will only show the notes that include all of your search keywords (i.e. meeting and notes both have to appear in the note for it to be included). But what if the note you are looking for is titled team sync notes or brainstorming session notes? You’d be out of luck.
- Put any: before your search term. For example, any: meeting notes will show you every note that contains either meeting or notes.
4. Exclude away
Not everything needs to be included. I’m more of a notebook person myself, but if you’re an avid tagger, then this tip is especially helpful.
- Search for notes not tagged by using -tag. For example, if you’re looking for a receipt you haven’t submitted (and you’re diligent about using the proper tags), you can type -tag:submitted into the search bar to find receipts without the submitted tag.
- Use -tag:* to return all notes without tags. If sorting notes with tags is your thing, then this is a great way to see all the notes that you haven’t dealt with.
5. Describe and go
If you’re using Evernote in English on Mac, then you should definitely know about descriptive search. Use simple words to find things fast.
- If you clipped a great article last month but can’t remember where you put it, simply type in web clips last month and the Evernote search bar will do the work for you.
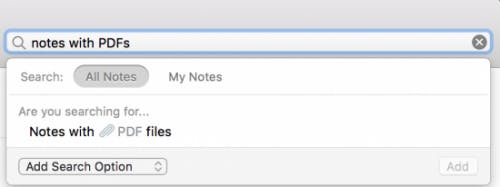
- To find that PDF you’re looking for, enter notes with PDFs into the search bar.
- See all the notes you created on your business trip to Germany by searching for notes from Germany.
6. Check your progress
Planners and list makers, this one’s for you. Searching your notes by checkboxes is a game changer.
- Search todo:false to view all of your notes with incomplete to-dos, an easy way to see what remains on your various task lists.
- Type todo:true to see what you’ve accomplished recently.
- Use todo:* to unveil all notes with checkboxes, checked off or not.

. Head straight to the source
We all remember things in different ways. I tend to remember notes by the method I used to collect them. The conversation I have with myself when I’m on the hunt for something specific often goes something like this: “Where is that PDF? I know I forwarded it into Evernote from my email, but where did I put it…” If your mind works that way too, (with the talking to yourself bit included), then these tips are for you.
- Type source:mobile to see all the notes that were created from your phone. This is perfect for those times when you captured a great idea on your phone a few months ago, but then promptly forgot both the idea and where you put it in Evernote.
- Use source:mail.smtp to see notes added through email. This tip is great for when you remember forwarding an important email into your Evernote recently, but can’t find where you sent it. (Or in my case, sent it to the wrong notebook.)
- Try source:web.clip to see all the notes added via Web Clipper.
8. Manage your search by media
Adding attachments is part of what makes Evernote great. The ability to search for notes that contain specific kinds of media, from audio and images to PDFs, makes this nifty feature even better.
- Do a broad search by typing in resource:audio/* to see all notes with some kind of audio.
- Get more specific by searching resource:image/jpeg to find only JPEG image files.
9. All in a day’s work
Have you ever reached the end of the day only to think back, “What did I actually even do today?” Author and going paperless expert Jamie Todd Rubin brings us a great tip for solving this problem.
- Type created:day into the search bar at the end of the day. That way, you can review what you worked on and make any changes to your to-do list for tomorrow.
10. Look at what you’ve accomplished
We all put a lot into Evernote. Sometimes it’s fun to look back and see exactly just how much.
What about using Evernote syntax like this:
— vladimir campos (@vladcampos) April 13, 2017
created:20080101 -created:20081231
and so on for each year? 🐘😊
- Type in created:20160101 -created20161231 to find out how many notes you created in Evernote in 2016.
11. Saved search to the rescue
Now that you’ve been introduced to a few different ways to search, do you see yourself using any of these advanced techniques more than once? If so, you definitely need Saved Searches in your life.
- Create a saved search so you don’t have to refer back to this article or look it up again.
- Save even more time by adding saved searches to your shortcuts tab. (For example, you could save the todo:false search and add it to your shortcuts—that way you can quickly pop over and see what you still have on your to-do list at the end of every day.)
Go forth and search
In case you can’t tell, when you’ve got advanced search techniques by your side, the possibilities are endless. There are many more applications of these tips, so don’t be afraid to get in there, mix it up, and experiment to see what works best for your workflow.
Have any great advanced search tips that we missed? Share them in the comments below!